
Upsell & Downsell Funnel
Time: ~10 minutes | Difficulty: IntermediateThe 6-step version of this type (landing + second OTO + thank-you
relatedOrders) is the runnable basic-post-purchase example.
This tutorial uses native checkout pages — no custom HTML or Plugin SDK deployment needed. TagadaPay auto-injects checkout, offer, and thank you pages when no plugin is assigned to a step.
Prerequisites
What You’ll Build
A 4-step funnel with conditional routing based on offer acceptance:
The edges between steps use conditions to route the customer:
{ when: 'offer.accepted' }— customer accepted the offer{ when: 'offer.declined' }— customer declined the offer
Step 1: Initialize the SDK
Step 2: Create products
You need three products — one for the main checkout, one for the upsell, one for the downsell.Step 3: Create checkout offers
Checkout offers are standalone resources that you bind to funnel steps. Each offer references product line items via theirpriceId.
Use tagada.checkoutOffers.create() — this creates offers in the checkout offers table, which the native offer page can render.
Verify and list offers
Both upsell and downsell use
type: 'upsell' — they are post-purchase offers. For order bumps shown on the checkout page (before payment), use tagada.offers.create() with type: 'orderbump'.Step 4: Create the funnel with conditional edges
This is where the magic happens. Define four nodes and five edges withconditions.when to control the flow.
How conditional edges work
Each offer step has two possible outcomes: accepted or declined. The orchestrator checks the edge conditions to decide where to send the customer:Step 5: Activate the funnel
Creating a funnel defines the structure. Updating it triggers the routing engine — routes get mounted to CDN, pages become reachable.TagadaPay detects that your nodes have no
pluginId and automatically injects the native checkout plugin. The offer pages show the bound offer product, and the thank you page shows the order confirmation — no setup needed.Step 6: Verify and manage the funnel
Retrieve a funnel
List all funnels
Delete a funnel
Delete checkout offers
Complete Flow Diagram
- Checkout → Accept upsell → Thank You — Customer pays 99 = $148
- Checkout → Decline upsell → Accept downsell → Thank You — Customer pays 19 = $68
- Checkout → Decline upsell → Decline downsell → Thank You — Customer pays $49
Edge Conditions Reference
The funnel orchestrator supports a rich set of conditions you can attach to edges viaconditions.when. Use string format for simple conditions, or object format for conditions that take parameters.
Offer Conditions
Payment Conditions
Main Order Conditions
Evaluate the initial checkout order (the first order in the funnel).Last Order Conditions
Evaluate the most recent order (from the current or previous step — could be an upsell or downsell order).Customer Tag Conditions
Route based on tags attached to the customer (set via API or automations).Customer Geo Conditions
Route based on the customer’s geographic location (detected automatically from IP).Customer Device & Browser Conditions
Route based on the customer’s device, browser, or display mode.Traffic & Bot Conditions
Route based on traffic source or bot detection.Generic Conditions
Edge Priority
When multiple edges leave the same node, usepriority to control evaluation order. Higher priority edges are checked first:
Going Further
Add an order bump on the checkout step
Order bumps appear on the checkout page, before payment. UsestepConfig.orderBumps with mode: 'custom' to pick specific bumps:
Chain multiple offers
Add more offer steps between checkout and thank you. Each can have independent accept/decline routing: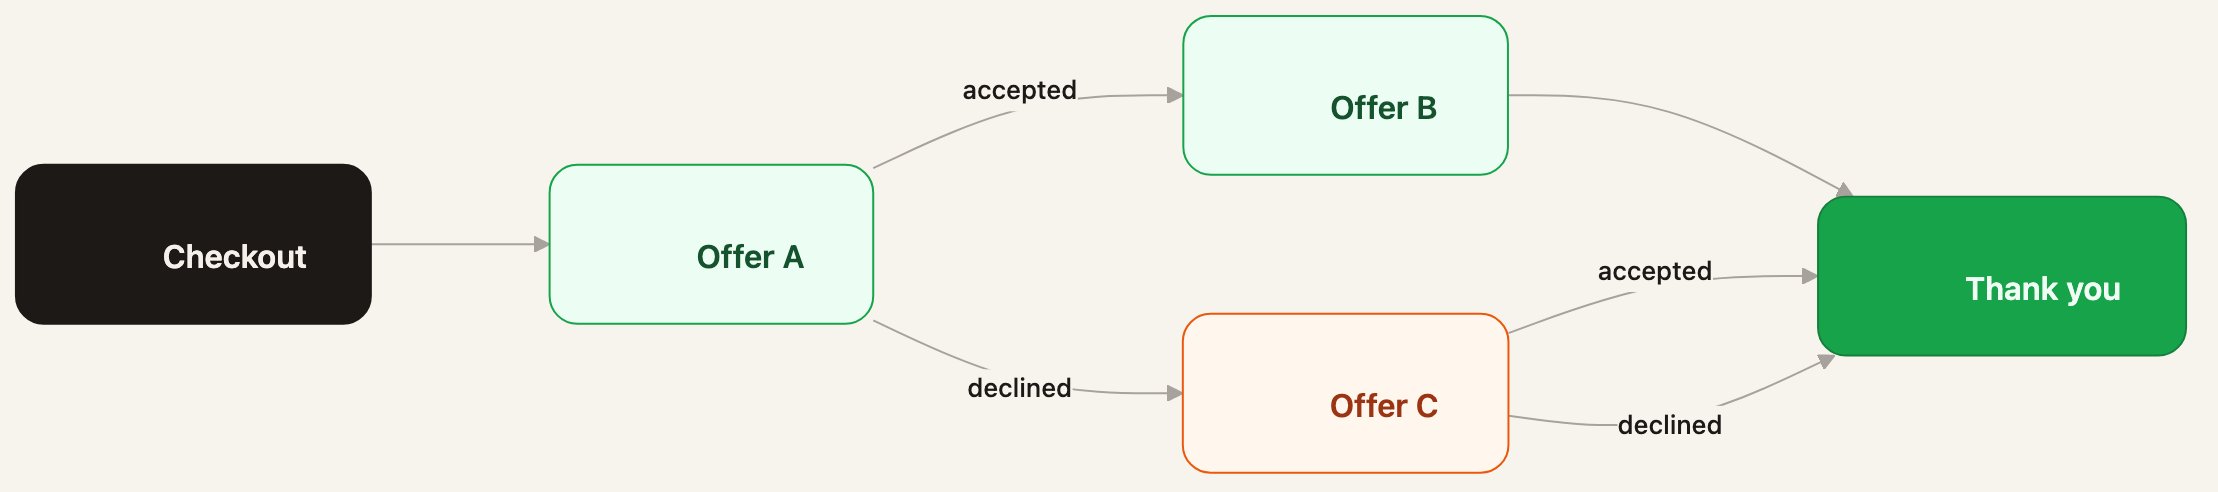
Geo-based routing
Show different offers based on customer location:Generate a checkout link
Use checkout sessions to create pre-loaded cart links:SDK Methods Reference
Funnels
Checkout Offers
Next Steps
Finished project on GitHub
Clone the 6-step Headless app for this funnel type
Basic post-purchase demo
Same type with a landing, a second OTO, and related orders on thank you
Funnel Orchestrator
Deep dive into funnel concepts — nodes, edges, routing, analytics
Step Config Guide
Configure payment methods, pixels, scripts, and order bumps per step
Funnel Pages
Three ways to build pages: native, custom HTML, or Plugin SDK
Merchant Quick Start
Full setup from processor configuration to live checkout